Wednesday, September 28, 2011

Excitement Is Abound

100 gold stars to anyone who can tell me what song I borrowed my title from!  But seriously, I am just so darned excited...my DIY Chalkpaint Table is being featured on Roadkill Rescue today!  I lurked on Beckie's wonderful blog Infarrantly Creative for months, soaking up her fabulous inspiration, so I am definitely feeling humbled and grateful and honored all at the same time.

I am also way excited about all my new followers!  And not just for the sake of, "OMG, there are actually people out there who want to hear what I have to say and see what I am doing??!?" (though there is definitely some of that) -- but also because I have "met" so many cool and creative and nice people already.  I might "only" have 11 followers (which is 10 more than I ever really thought I'd have), but seriously, y'all rule! AND I now have your awesome blogs to peruse, which is like the whipped cream on top of the icing on the cake!

And finally, a brief update -- I'm in the midst of DIY Chalkpaint project #2 and have not had the same problem with slow drying as I had with the table.  It occurred to me as project #2 was drying at lightning speed that I usually paint outside during the day, but in my extreme enthusiasm to test my concoction, I was painting at night.  No sun + 1000% humidity = slow drying.  Duh :)  I am anxious to get this project finished and posted, but other things are probably going to keep me busy for the next 3-4 days.

And finally, because this has been such a word-heavy, picture-sparse post, a random photo of the 2 little people who totally rock my world -- meet Sweet Pea and the Little Dude:

No, my kids don't drink Diet Mountain Dew. Not their horse = not their Mountain Dew. Pinky swear!

Since I suddenly feel accountable due to having actual readers, let me go ahead and say I'll probably be absent for a few days, so happy early weekend! Hope it's full of creativity and crafts and thriftiness and whatever else floats your boat!

Saturday, September 24, 2011

DIY Chalk Paint Project is Finished!

Since my last giddy post on Wednesday night, I’ve finished the little table that served as my diy chalk paint guinea pig.  I did opt to add some blue/green paint on Thursday, and then waxed (clear & dark) last night.  I know at least a couple of you are anxious to see the finished product, so I won’t keep you in suspense any longer….


Y’all….I may be just a little in love with this table. 
Crazy considering its origin – it was a free Craigslist yard sale leftover, and when I picked it up it was so wobbly it nearly fell apart in my hands.  Tightening a couple of screws on the legs fixed that problem right up, (amazing how many pieces get dumped just because it apparently never occurs to someone to flip ‘er over and bust out a screwdriver on some loose screws) but I wasn’t completely sure that there was any hope for the red/brown laminate finish that covered it. 
Here's the before:

My original intent was to use it as a test piece for the new HVLP sprayer I picked up at Harbor Freight a couple of weeks ago…but that plan changed as soon as I saw No Minimalist Here’s post on making your own chalk paint.  Since the main reason I kept eyeing the Annie Sloan Chalk Paint was its ability to bond to a variety of finishes without stripping, sanding, or priming, I thought this cheap laminate table would be the perfect test to the staying power of the diy version.  I used plaster of paris in my mixture since I already had some on hand, at a ratio of approximately 1/3 plaster of paris to 2/3 paint (off white Valspar oops paint in Satin finish), as Sherry recommended.  Oh, and a few drops of water to thin the consistency a little. You certainly don’t have to be precise with any of these measurements. One coat of my concoction gave me this:

I forgot to mention that I did wind up sanding the top, since I noticed that under its nasty, flaking, red finish there appeared to be actual wood.  I gave the top a couple of coats of Minwax Dark Walnut that I had on hand from another as-yet-undocumented work in progress. 

I had to make myself walk away and leave the poor thing the heck alone at this point, because the paint was drying slowly, and I’m impatient so I kept touching it and causing smears.  Sigh, the waiting really is the hardest part.  Anyway, I’m not sure if the slow drying is inherent to the mixture, or a function of the 1000% humidity we have here in Savannah…probably both.
Once the paint finally dried, I touched up a few streaky spots (mainly where I’d touched it, d’oh!!) with a second coat.  Although it was looking about a million times better than I’d ever thought this cheap big-box-store piece of furniture possibly could, the dark top and barely off-white bottom was feeling a little stark for my taste.  I considered stenciling something on the bottom shelf and/or top, but in the end my impatience won out yet again (surprise, surprise) and I opted to dry brush the same turquoise blend I had left over from my still unposted living room dresser project.  I did NOT mix this layer with plaster of paris.


Next, I hit it with my sanding sponge to distress it a little, and realized that the chalk paint mixture had stuck so well that it was going to take some lower grit sandpaper and some serious elbow grease to sand it off.  Everything I’ve read about Annie Sloan Chalk Paint notes that it distresses exceptionally well, so this may be one big difference between the high dollar stuff and the diy alternative.  Oh well, my batwing upper arms need the workout, anyway.  I really didn’t intend for the bottom shelf to have quite so much distressing, but after I managed to take out a big gouge of paint with the 60 grit sandpaper I’d resorted to using, I just went with it (you may have noticed by now that this is another recurring theme in my projects!).

Finally, 2 coats of wipe-on poly and 1 coat of wax for the top, along with clear and dark wax for the bottom finished it off.  I am so happy with the way it turned out, and if I saw this in someone else’s house I don’t think I’d ever guess its humble origins. 
All in all, I am beyond happy with Sherry’s diy chalk paint recipe, and I will definitely be using it for future projects – like the 2 twin headboards with the icky spotted 80’s finish that I have no intentions of stripping off their intricate lattice-style designs.  I also foresee myself trying the gesso method that The Other Me Is Sane has been using … in fact, I’m anticipating a future post comparing the relative merits of the various recipes I’ve seen in the past week.  
And in the meantime, I’m off to scan my house for places my little table could live, because I’m not sure I’m going to be able to give this one up!

Wednesday, September 21, 2011

Make Your Own Chalk Paint? Oh Hellllz to the Yes!

Can you tell I am excited about my latest project?

The moment I visited one my of favorite blogs, you are {talking} too much, and saw Rebecca's post, in which she shared Sherry at No Minimalist Here's guidance on making your own chalk paint, I was anxious to give it a try.  And by anxious I mean, perched on the edge of my seat, fidgeting my way through the work day, and rushing home to drag out the plaster of paris and choose the perfect shades of oops paint before the kids were even fed, much less in bed.

It was a little sad, really.

But the verdict?  So far...pretty freakin' awesome!  Here's a poorly lit, shot-with-a-misbehaving-camera-at-night sneak peek of my pilot project:


Underwhelming, yes?  But I promise that I can already tell, great things will come of this eventually!  I could have held out for the stunning final reveal, but I was just too darned excited not to share along the way.

Now, my opinion is probably less-than-totally-informed because I never did muster the guts to plunk down the cash-o-la required to try out the Annie Sloan Chalk Paint, so I can't offer a head-to-head comparison.  But I can say that my "Kristybelle Chalk Paint" (henceforth known as KbCP) went on like a dream, with fantastic coverage and a most pleasant feel to the paint. Best of all, I decided to dig right in and throw this paint a real challenge -- the piece pictured above started out as a dark reddish brown laminate freebie that I did not sand or prime first. Because being able to skip those steps was the main reason I was interested in the Annie Sloan Chalk Paint, I wanted a hard core test of this mixture's sticking power. All I can say so far is WOW -- once dry, it showed no signs of budging. 

I cannot wait to finish this piece and see how it turns out...I'm thinking of maybe adding a second color of greenish blue KbCP, similar to the dresser I redid and put in my living room (but haven't posted about yet -- shamey shamey) and of course some distressing and wax.  Arrrrghhhh....curse you, drying time and my real job for putting me on hold until tomorrow night! (Note to self:  lotto tickets...because I can't win if I don't play!)

Thank you, thank you, thank you Sherry for being brave enough to experiment, and generous enough to share your instructions with the blog world....and thank you Rebecca for leading me to her!!!

Tuesday, September 13, 2011

"Driftwood" Finish Table

So...two whole months between posts, that's totally cool, right?  It's only because I've been so busy acquiring working on new projects that I haven't taken the time to document them.  (To my husband. Who is the only one I've been brave enough to show this blog to just yet. Ahem.)

So anyway, on to the latest project to actually get finished.  Sneak peek!!!


Although, in more bad-blogger news, I did not take a before picture of this particular table.  I was not feeling all that optimistic about how it would turn out, especially since this was a Craigslist curbside freebie.  That was set out right before a typical Savannah August afternoon monsoon.  Niiiiiice.  Just for illustrative purposes, here's some similar tables that I saw on CL recently:


In fact, the second set is pretty identical, except my coffee table did not have any smoked glass, and it came with only one side table friend.  Ahh yes...revel in its round-edged, light wooded, chunky-yet-straight legged 80's glory.  Why did I even bring it home?  Not to mention brave the pouring rain to hoist this heavy-arsed thing into the truck? 

Well, as it happens, I've been sort of looking for a table ever since the foster dog chewed the corners off my cute-but-particle-board-topped coffee table about 5 minutes after the hubs and I got married, NINE YEARS AGO.  I wanted something that looks good, but way cheap, so I wouldn't be upset when the kids inevitably scribbled and sharpied and glitter-glued it to death (RIP, previous dining table).  Free sounded just about right.  Even though it was the CL equivalent of a blind date (curb alert with no photo provided), I figured worst case scenario I could always refurbish it into usability, or re-free it if necessary.

When I brought it home and placed in the living room, I was thinking that it was probably a bit too tall to mesh with our sofa and loveseat, but I was prepared to live with it for a day or two to think it over.  Then hubs walked in, made the yuck face, and proclaimed that he'd had the exact same table once upon a long, dark time ago when he was married to She-Who-Must-Not-Be-Named.  That did it...this table ain't stayin' in my living room!!

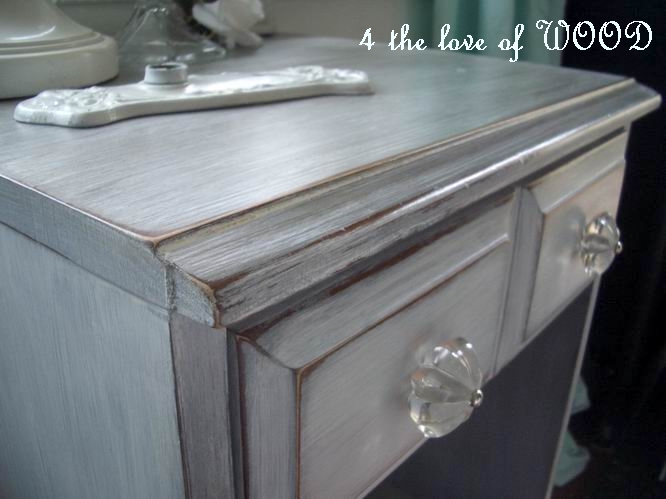
My next thought was that this would be a good opportunity to test a paint technique I want to eventually try on the monster 90's pine armoire in my bedroom.  I absolutely fell in love with the look that Kristy @ 4 the love of wood achieved with this piece:


Even though I've seen similar finishes since then, this is still the one that takes my breath away!

The only problem is, I didn't have real grey primer, just some grey enamel underlay from Ace Hardware's mistint shelf.  And I didn't have any water-based white primer, just oil-based. Nor did I have gel stain on hand. But what I did have? Impatience to get started, and lots of it.  So I used the enamel underlay and watered down off-white latex, along with my trusty clear and dark waxes and a cute jute rope handle and and this is what I wound up with:

Unstaged...pretty cute but kinda, yawn...

Now that's what I'm talkin' bout! Look at that texture!

Rope handle + dark wax = making me smile

 Awww, can't we keep it?!

After getting the top whitewashed I realized that I wasn't really getting the look I was aiming for -- not surprising since I wasn't using the materials I should have, plus the top of this table was fairly well pre-distressed, and I didn't want to sand all that goodness away.  But I was really digging the beachy vibe, so I went with the flow, and wound up with something that reminds me of a driftwood finish.  Um, LOVE!  Here's hoping that someone else around here in coastal Georgia sees it on Craigslist and loves it, too!!

(PS -- major props to my mom, who not only made the 8 hr trip from VA to visit us, but then spent a couple hours of her visiting time helping me wax this table in the oppressive August humidity that stubbornly insists on lingering even at 10 pm.  Thanks, Mom!)